Welcome to the YADrone tutorial !
The tutorial will guide you through the first steps setting up a Java (not Android) project, connecting to the drone and getting the drone to do something.
As YADrone is based on the ARDroneForP5 project, you might want to consider reading [ their documentation ] once you finished this tutorial, because they give you a deeper insight into the API and explain the most important method calls.
Attention ! The API changed with version 0.3 ! This tutorial covers YADrone 0.2.1 !
A more recent version can be found [ here ].
0. Start
Before we get to the actual programming, we need to set up our development environment, i.e. the YADrone project. This tutorial assumes you are working with eclipse, hence all steps refer
to that IDE, nevertheless you might use an alternative IDE of your choice, because Section 1 onwards is independent of any IDE.
So, to create an eclipse Java project, follow these steps:
- Open eclipse
- Go to "File -> New ... -> Java Project" and give your project a nice name, e.g. "YADroneTutorial"
- Now download the "jar-file (Library only)" from the download section (you only need the jar, not the sources)
- Create a new directory, called "libs" in your Eclipse project and put the library in that directory.
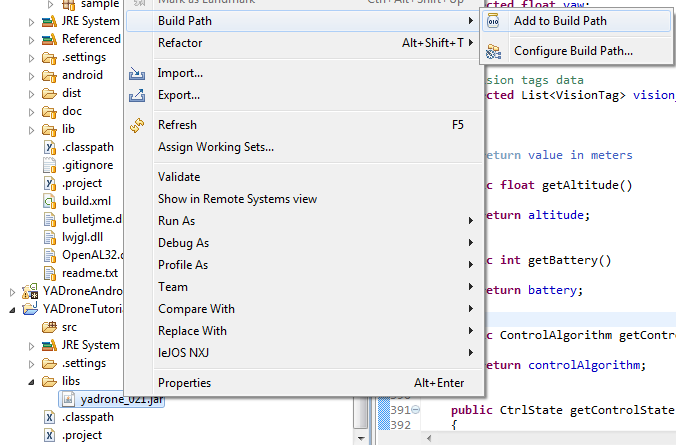
- In order to add the library to your project's classpath, right-click on the jar in your lib-folder and choose "Build Path -> Add to Build Path" (see figure below)
- We're done with the first step. Your YADrone project is ready. In the next Section, we will create our first class and establish a connection with the drone.
1. Connecting your Application with the Drone
Connecting to the drone is no big deal IF and only if your Wifi is connected to the drone. The drone acts as a Wifi access point. Hence you need to establish a Wifi connection with your PC. Note, the connection in not encrypted (e.g. with WEP or WPA) and the drone assignes an IP address to your PC via DHCP. Hence you need no special configuration for the connection. If you have problems with the connection, please have a look at the [ FAQ ] !
- At first, we need to create a main class. Let's name it "TutorialMain".
- Then, simply add the following code snippet to your class. An explanation follows below.
public static void main(String[] args)
{
    ARDrone ardrone = null;
    try
    {
        ardrone = new ARDrone("192.168.1.1");

        // prepare the CommandManager to send AT commands to the drone
        boolean commandManagerReady = ardrone.connect();

        // prepare the NavDataManager to receive Navdata from the drone
        boolean navDataManagerReady = ardrone.connectNav();

        // prepare the VideoManager to receive a live video stream from the drone
        boolean videoManagerReady = ardrone.connectVideo();

        if (commandManagerReady && navDataManagerReady && videoManagerReady)
        {
            ardrone.start(); // and now let all the manager start to do their work
            System.out.println("Successfully connected to the drone");
        }
        else
        {
            System.out.println("Failed to connect to the drone");
        }
    }
    catch(Exception exc)
    {
        exc.printStackTrace();

        if (ardrone != null)
            ardrone.disconnect();

        System.exit(-1);
    }
}
-
Within this snippet, an ARDrone object is instantiated by providing the IP address of the drone (it defaults to 192.168.1.1).
Using this object, the CommandManager (responsible for sending AT commands), the NavDataManager (responsible for receiving NavData) and the VideoManager (guess what that one's good for) are first initialized, by calling the respective connect()-methods. Each method returns a boolean indicating whether initialization was successful.
When calling start() all managers will beginn their work: the CommandManager will continuously send commands to the drone to keep the connection upright, the drone in return will send NavData and a video stream.
Using this ARDrone object you can also register listener for NavData and video (which be explained in the next section) and you can control the real drone. Hence you can think of the ARDrone object as some kind of virtual counterpart or representative of your real drone.
2. Listening for NavData
NavData contains information about the current state of the drone, like battery level, altitude, pitch, roll, yaw, velocity and a lot of other internally used flags.
This data is sent by the drone quite frequently (~ 25 ms).
YADrone provides several listeners for different aspects, which are very easy to use as you will see in the following self-explanatory examples:
-
ardrone.addAttitudeUpdateListener(new AttitudeListener() {
    @Override
    public void attitudeUpdated(float pitch, float roll, float yaw, int altitude) {
        System.out.println("Pitch: " + pitch + " Roll: " + roll + " Yaw: " + yaw);
    }
});
Note, there are known issues with the altitude. For whatever reason it's always 0.0.
-
ardrone.addBatteryUpdateListener(new BatteryListener() {
    @Override
    public void batteryLevelChanged(int percentage) {
        System.out.println("Battery Level: " + percentage);
    }
});
-
ardrone.addStateUpdateListener(new StateListener() {
    @Override
    public void stateChanged(DroneState state) {
        System.out.println("State (in hex): " + state);
    }
});
Note, the drone state is explained here in more detail.
-
ardrone.addVelocityUpdateListener(new VelocityListener() {
    @Override
    public void velocityChanged(float vx, float vy, float vz) {
        System.out.println("Velocity-X: " + vx + " Y: " + vy + " Z:" + vz);
    }
});
Note, there are known issues with VZ as well. For whatever reason it's always 0.0.
-
ardrone.addNavDataUpdateListener(new NavDataListener() {
    @Override
    public void navDataChanged(NavData navData) {
        System.out.println(navData);
    }
});
The NavDataListener is the most generic listener and subsumes all other listeners. It gives you access to all NavData information as received by the drone.
-
If you implement all of the above listener, the output will look like this:
State (in hex): DroneState(f8004d4)
Battery Level: 76
Pitch: 1.266 Roll: 0.905 Yaw: 14.509
Velocity-X: 0.0 Y: 0.0 Z:0.0
IsFlying: false
IsVideoEnabled: false
IsVisionEnabled: true
controlAlgo: EULER_ANGELS_CONTROL
[...]
3. Displaying Video
Listening for video frames is as easy as listening for NavData. You just have to register a listener which will receive individual images. You then have to draw these images onto whatever you want.
- At first, we need a new class, e.g. "TutorialVideoListener"
- This class shall paint the images received from the drone, hence it needs to extend JFrame and override the paint()-method as shown below
public class TutorialVideoListener extends JFrame
{
    private BufferedImage image = null;

    public TutorialVideoListener(final ARDrone drone)
    {
        super("YADrone Tutorial");

        setSize(640,360);
        setVisible(true);
    }

    public void paint(Graphics g)
    {
        super.paint(g);
        if (image != null)
            g.drawImage(image, 0, 0, image.getWidth(), image.getHeight(), null);
    }
- Next, we only need to register this class as an ImageListener and repaint the frame's pane every time a new image is received:
drone.addImageUpdateListener(new ImageListener() {
    public void imageUpdated(BufferedImage newImage)
    {
        image = newImage;
        SwingUtilities.invokeLater(new Runnable() {
            public void run()
            {
                repaint();
            }
        });
    }
});
Note, that the repaint-method need to be called from the GUI-thread, therefore we use SwingUtilities.invokeLater(...). That's all we need to do in order to display the drone's video stream.
-
The ARDrone has two cameras, one pointing forward and one pointing down. We can easily switch between those two streams as the following example shows:
addMouseListener(new MouseAdapter() {
    public void mouseClicked(MouseEvent e)
    {
        drone.toggleCamera();
    }
});
Now, when we click on the video, the camera is toggled (from horizontal to vertical and vice versa).
4. Controlling the Drone
Controlling the drone is of course the most important part. YADrone offers several commands to achieve this. However, YADrone is an experimental framework and gives no guarantee to operate flawless !
Therefore, take responsible precautions when using YADrone !
- In the following, the drone shall automatically takeoff, then fly forward, stay there for a few seconds, fly backwards again and land.
The following code snipped demonstrates this:
toDo
Final Remarks
The API documentation can be found [ here ] (actually this is the documentation for the ARDroneForP5 project, but the YADrone-API is nearly 100% the same).
YADrone extends ARDroneForP5 a little bit, but these changes are mainly framework internals. However, the desktop version of YADrone ships with an additional control center for your drone, visualizing the drone's state and letting you control the drone via keyboard.
The main()-class for the control center is gui_desktop.YADroneControlCenter.
You can find the sources for this tutorial either in the [ Github ] repository or download the self-contained tutorial project here.
Moreover, there are 3 test cases that show how to use the API. You'll find these here: sample.ARDroneTest, sample.Move3DTest, and TakeOffLandTest
[ Back ]
|